Flat-white all around wasn't working for me. I kept loosing track of the plane on cloudy days and it was difficult to tell orientation once the plane got further away. Also, it was very difficult for me to pick it out of the sky when I'd glance down at the screen that was showing my camera feed from the plane.
So I decided to paint the plane. I whipped up a couple of possible paint schemes and decided to try my hand at giving it a custom paint-job.
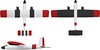
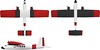
Here's the whole week's worth of painting done in about 5 minutes:
I kind of ended up with the main paint scheme of the first design, with the tail of the second. I wanted to do entirely the first paint scheme, but messed up when I was masking things off (that'll learn me).
Steps involved were:
- Clean the plane with alcohol to remove any chemicals from the moulding process when it was created
- Sand down the entire body of the plane (using 300 grid sandpaper) to provide a smooth surface
- Fill in the larger gashes with lightweight spackle
- Tape off the important bits I didn't want to get any polycrylic in (pushrod holders, cockpit, engines, control surface joints)
- Lay down a base-layer of polycrylic to paint over
- Lightly sand the base-layer in preparation of painting
- Mask off the areas that I didn't want painted black
- Paint it black
- Remove black-masking and apply masking for red areas
- Paint the town red
- Remove masking tape from red areas, and patch up any spots that the masking tape tore off of the black paint (because I didn't wait long enough to let it dry)
- Fix up any edges that weren't sprayed neatly with white paint, and fix the error I had on the one wing by hand with red paint
- Cover entire thing with final protective layer of polycrylic
- Happiness
No comments:
Post a Comment